
There's something I learned early in my IT career (and even at the beginning of my cyber career), and that is, when someone asks you "what are you working on," your answer should never be "nothing" or "I don't know." You should always have an answer and be able to briefly talk about the key points of the project and why you are working on it.
What photography projects are you working on? In the new economy, it's no longer acceptable to work a day job or during normal business hours as a business owner. Your work no longer speaks for itself. You need to demonstrate your prowess with projects in the technical, artful, and straight up artisanal way.
This isn't just a way to get just another photography job. This is a way to realize your full creative potential and even learn to offer new services or specializations to your customers. Read on for some inspiration on projects you can tackle.
Table of Contents
Starting a New Photography Project
You may be wondering how to start a new photography project in terms of subjects, scenery, and storytelling. After all, you are looking to showcase a series of images in a way to tell a compelling story. In doing so, you would be looking to do the following:
- Decide on subjects, location, and term.
- Understand the equipment needed to pull of this task.
- Editing your work, not just in photo optimization, but also sequencing.
- Publishing your work.
However, visual creativity is but one aspect of photography. What about the technical side? If you learned to do one technical thing a month, would that help you become a better photographer? Probably not in the creative sense. After all, there is a reason why you need to learn composition, lighting, and so on. But what about the service or specialization sense? You betcha!
For example, if you learned to digitize and develop film, you could find a way to use that to your advantage. There are people out there, businesses included, who would rather send their old film to a photographer they trust as opposed to a big box store with a crew of glorified cashiers (no shade here). Even the automated kiosks are a pain in the rear. They don't work half the time and it can be a huge security risk. The marketing on the sales page practically writes itself here.
Digitizing and developing film probably won't be your cash cow, but it's one of many examples of what you could learn. In the very least, it would make a great series on your studio's blog that could bring in web traffic.
Examples of Technical Projects Using Raspberry Pis
You certainly don't need a Raspberry Pi to do some neat technological photography projects, but the creative juices really seem to flow in this subreddit. I usually don't go to Reddit, but there are some really interesting things happening in r/raspberry_pi, especially in the photography niche.
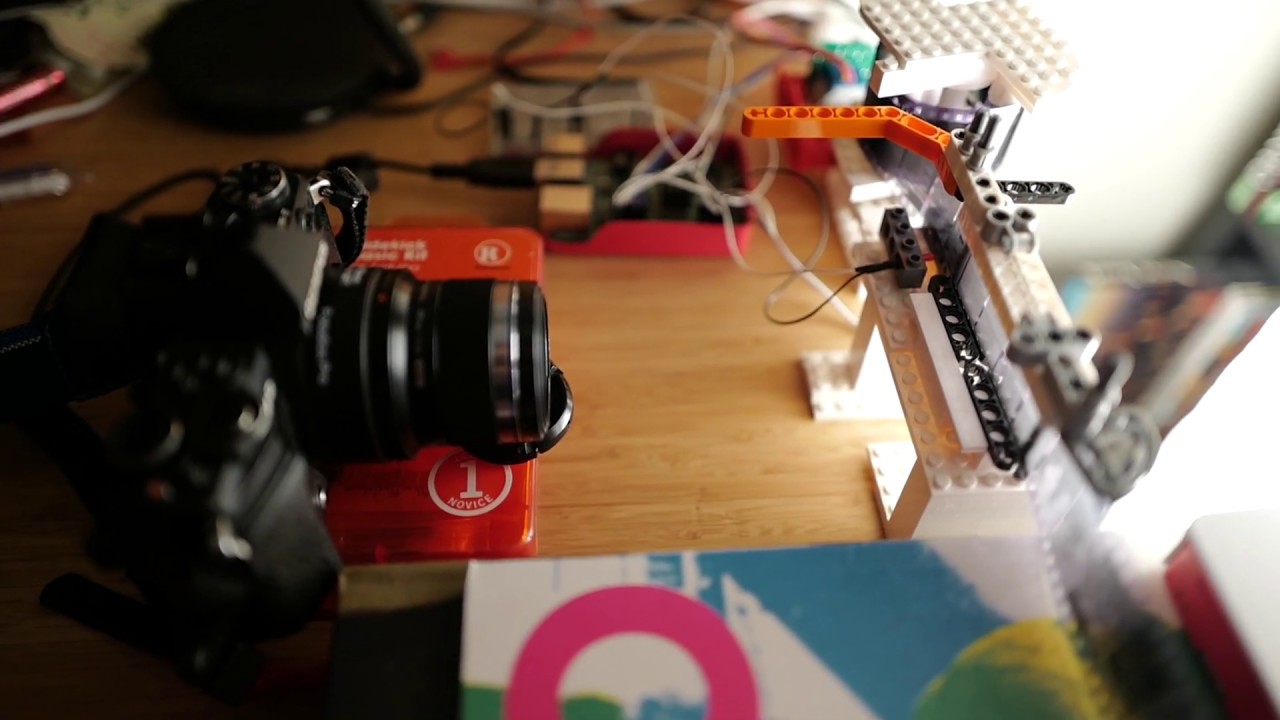
RoboScan Using Film and Legos
This is a great application of my previous film example above. This user learned to develop analog film and then built a prototype Lego robot to scan the photos. This is a very cool project to learn, again a great series on their blog if they were a photographer.
The video below shows this setup in action. You can also check out the source code to the project on the user's GitHub project page. It uses python, libgphoto2, a (digital) camera, a TSL2561 lux meter, samba, and IFTTT. This all connects to a Raspberry Pi 4.
Project Details
The user's general consensus:
I'm actually surprised how well it works. The difficulty is to count the "holes" on the side of the film, and I only had a lux meter for that. But it turned out to work well, and it can scan 36 photos without missing one hole.
Only developing in black and white because it's much harder to develop color film. This setup can work fine in color so long as:
- You have a higher-quality backlight to provide richer colors (It's more sensitive to the lighting so look for a high CRI).
- You invert the colors. Inverting color film is harder, as there is a strong color cast. In Lightroom you can use Negative Labs Pro (check out their website on a lot of details for proper scanning). The user uses Capture One with a script to invert.
On developing color, another user warns:
Please, do not develop color film in your home. The process uses chemicals that are rather poisonous, and breathing the fumes can have long term effects in your health. Send it to a lab.
Lego parts were made up of 2 types:
- Classic bricks from Lego Architecture Studio (discontinued and expensive so you can replace with classic basic parts).
- Lego Technics (possibly the most important). The user used box # 42032 which provides long bars. This gives a tiny bit of space, just enough to have film glide through.
- Also used a stepper motor with a 3d-printed part I had left from another project (very important).
What about 8mm reels?
- Legos would probably be too imprecise for 8mm films.
This seems hard. Was it?
Difficulty getting started was fairly high, but it was important to prototype and iterate. He did start with a manual setup and got a lot of info from the Negative Lab Pro website. The payoff was big because as a result of the project, the user now has RAW files which give a lot of latitude for processing, compared to TIFFs from a scanner. And the colors and level of detail is much better than some scanners out there.
This is a great way to DIY with 2 of the best DIY items you can buy without a huge investment. What if he adds a 3D printer? You can really take it a step further. In its current form, Legos make a great prototyping tool as you can make almost anything with them.
The prototyping lead to easy iteration, which is great since he made roughly 5 versions of it, improving each time. Went in this order:
- Started with the central part, which is the scanning window.
- Then added the sensor to count the holes.
- Finally adding the stepper motor to roll the film.
The main drawback being that Legos aren't exactly precise and it's not as easy to connect non-Lego parts such as standard motors and servos.
Prototyping and testing lead to feeding film several times. Luckily he used film that wasn't super important to him. There wasn't much damage after feeding the film several times as the top and bottom parts are where the holes are and this is how he guided them through the plastic.
Possible fixes in the future:
- For high-quality scan, you need to have a good backlight and a good macro lens.
- Setting up vertically would be better, using a tripod or vertical stand. It's much easier getting things parallel. There are issues when the film is horizontal when the film reaches the end.
- 3D-printed guides would hold the film better in place. Hopefully, the community will be inspired to make open-source 3D-printed parts to make it easier.
- A solution for cut film strips would be good. It's quite uncommon to have uncut rolls unless you develop film yourself.
Overall project thoughts:
The idea of scanning older film roles is great. It's extra work compared to using a digital camera. It's not efficient but shooting film has its own charm, which is why people still do it to this day. Besides, using old cameras is a great way to discover different rangefinders and great craftsmanship of the technology.
It also forces the photographer to slow down and thing more about the shot. This better education naturally makes the photos better, which translates to more profit for the photographer when using digital.
Other Projects
Portable Astrophotography
Camera Built with Recycled Parts
Part 2
Camera Build Setup
This is not an actual DSLR camera, but still a cool project. More details on Nick's Hackster project page.
Conclusion
Photography projects help you acquire new skills and test new boundaries. This is generally thought of as an improvement of photography through photography. Experience and experimentation is king here. Don't get me wrong, this is worthwhile. Just know as you are taking pictures of food, mastering depth of field, and other fun photography projects while you are at home, there is another side you can work on as well.
No, I'm not referring to taking additional photos for your portfolio. I'm talking about other fun photography projects you could attempt in a technical nature. This could develop into a service or specialization you could offer to future clients. It's not really that farfetched either. You already have to be technical with your camera, computers, storage systems, and creative applications. Why not learn other additional tech skills to compliment your current skillset?